Saturday, November 5, 2016

How to Open a LinkedIn Page


  • LinkedIn is one of the largest professional social media platforms.
  • LinkedIn is a social network that emphasizes on professional networking and career purposes.
  • LinkedIn is intended for professionals, entrepreneurs, employees, recruiters and job seekers.
  • You will be able to make valuable connections with people from your area of expertise and even to find a job.


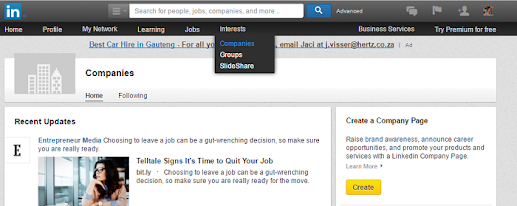
1. At the LinkedIn homepage, go to "Interests".


2. Select "Companies" from the drop-down menu. 

Click the "Create" button in the "Create a company page" box on the right. 


3. Enter your name and company email address.


4. Verify that you are eligible to create a page on your company's behalf and then click "Continue".


5. Complete your company profile.


6. Create your company description and overview of what your company specializes in as well as its uniqueness.


7.  Add the company logo and an eye-catching background banner.
  •  I suggest you use Canva free website to create a banner.
  •  It has been the best thing that happened to me.
  •  Sign up for free at www.canva.com and start using it immediately.


8. Engage or request your colleagues and employees.

 Make sure you do not use this platform as mainly an advertising forum but for company tips, news, or industry discussions.


 9. Always include your company or website links.


10. Include the " Follow" button. 


11. Add your contacts.


12. Include images, infographics, videos, and SlideShare presentations.


13. After completing the creation of your company page, the first thing to do is to grow your community of followers. 


This is easily done since you have to know your target audience.


They say that the best times to post on LinkendIn is midweek; Tuesdays, Wednesdays, and Fridays between 10am and 11 am.

Learn How to Grow Followers


 Start with your employees and let them be your followers so that they will add to your company profile and help bring traffic to your professional page.


Let your customers become your followers and make sure you make regular updates to establish brand awareness.


 Make sure that you add rich content articles, company news, and specials.


 Make sure as you do updates, you also join in the conversations and comments.


 Put images, links, and videos as you update.


Engage your audience and give them all you have. They will always come back to your page and website.

Saturday, September 10, 2016

How to Sign up For a Pinterest Business Account: 8 Simple Steps


  • Pinterest is a very popular social network for sharing and arranging in-order photos or pictures. 
  • You find and then save stuff such as recipes, artwork, makeup tutorials, style inspiration, wedding themes, fashion, etc. 
  • Just like other popular social media networks; Twitter, Facebook, Instagram, LinkedIn etc, Pinterest is very easy to sign up as well as free to join.
  • The first thing you should do is navigate to Pinterest's home page, https://www.pinterest.com/join/
  • There you will be given 2 sign up choices or options.
  • The first option will be signing up with your Facebook account.
  • The second option will be signing up with your email address.


  • If you choose signing up with your email, www.pinterest.com 
  • will ask you to confirm the address by going to your email inbox and clicking on the confirmation link they have sent you. 
  • Notice that when you are done signing up, Pinterest will make your username as part of the web address.
  • For example; my user name looks like the link below; 
  • https://www.pinterest.com/SabieMogojwe/

1. Choose a Username

  • Choose a different or unique username that people can remember easily.
  •  You are allowed to change it later on if by any chance you have second thoughts about it.

Business Account

  • If you are a business or company you can sign up for a special “business” account.
  •  It is free as well. 
  • The Pinterest business account is not too different from the personal account.
  •  A few added features such as buttons, widgets, etc are advantageous.

2. Sign up for a Business Account

  • Sign up on the below link for a Pinterest business account;
  • http://business.pinterest.com/  if you want to create an account for your business or company.


3. Create Your Profile

  • It is a wise idea to use the same username and profile picture for all your social accounts such as Twitter, FaceBook, LinkedIn, etc if at all you have more.
  •  If you do that it will make it easier for anyone who will follow to know it’s you.

4. You will be asked to "like" 3 topics for Pinterest to build a custom home feed for you.


5. Install the Pin It Button

  • After that Pinterest will ask you to choose your Pinterest "save button" for your browser. 
  • This usually varies according to the browser you will be using.


  • Congratulations you are done with creating your Pinterest Business page. 
  • Below is the final step.


6. Settings

  • After your account is active, go to your e-mail settings.
  • Turn notifications on.
  •  Pinterest will send you notifications when someone pins, follows, or likes your pins, or even repins from your boards.


 7.  Add a Pin

  • A pin is more like a bookmark but visual or in images.
  •  A pin will take you straight to the website of whatever image you will be pinning. 
  • As you pin an image, you will be saving it for later.
  • To add a pin to your boards, click on either the "Pin It" button on the website you're reading.
  •  A screen will pop up asking you to select the image you want. After selecting the image (pin) save it to a new board and name it.


8. Creating a New Board

  • A board is where you save your pins (images) for later. 
  • To create a new board on your account, click your “profile button” at the top of Pinterest >click the” create a board” box > choose a name for your board and category. 
  • You can choose to make it public or private.


Now you can start following people of the same interest as you. Enjoy!

Thursday, July 28, 2016

How to Open a Facebook Page: 6 steps


What is Facebook?

  • Facebook is one of the most widely used social media networks in the universe.
  • Among others Twitter, Instagram, Pinterest, and LinkedIn. There are over 3 billion people actively using Facebook daily.
  • You do not have to be a web designer, or programmer or even hire one to create a Facebook page.
  •  As long as you have a personal Facebook account you are ready to go within a few minutes. 
  • By the way, it is not only easy but free as well.
  •  So here we go, let’s look at the first step to create a Facebook page.

1. Sign up for Facebook Personal Account


In case you do not have a personal Facebook account or are new to Facebook, let’s pass by quickly on how to open your first personal Facebook account.


  •  Fill in your contacts; full name, mobile number, email address, password, birth date, gender, agree to terms, and then click “create account. 
  • Your Facebook account will be active immediately.
  •  Add a profile picture and start sending friends requests.
  •  Start socializing with loved ones.
  • Now back to our steps to creating a Facebook page.

2. Choose a Classification


-Local Business or Place
-Company, Organization, or Institution
-Brand or Product
-Artist, Band, or Public Figure
-Entertainment
-Cause or Community

  • After selecting your desired classification, you will be asked for an official name for your Business Page.

3. Complete Basic Information

“About section”

  • Make a couple of sentences on the part where you have to give a description of your company. 
  • Include a link or URL of your company website.
  • This part is the most important as people will visit your website through it and give you clicks.

4. Upload a Colorful Cover Photo Visual


  • Upload a cover photo that will get people’s attention and attract them to your contact.
  •  Make sure that you can include a message in your cover photo.
  •  The photo size should be 851 x 315 pixels.

5. Upload a Profile Photo


  • This will be the smaller image that will appear on your Facebook Page as your avatar on all posts, content as well as pictures you will publish on Facebook. 
  • The photo you choose must replicate your business brand or niche. 
  • The recommended size is 180 x 180 pixels.

6. Add Content and Post


  • Add content and post/publish it.
  • You can then you can start by asking or inviting your Facebook friends to like your page. 

Bluehost